可在大多數電腦作業系統運行,是目前主流的網站伺服器。
然而他是我第一個架設的Web Server,既簡單又實用。
本次安裝以非root的身分去執行安裝Apache Web Server。
安裝需求:
- 作業系統CentOS7
- 參考以下架設流程
STEP 1:安裝Apache與設置重啟啟動
1.首先清除暫存區rpm文件與文件包
$ sudo yum clean all
(如安裝完Apache也可以執行此指令清除,節省硬碟空間。)
2.再來更新系統
$ sudo yum -y update
2.再來更新系統
$ sudo yum -y update
3.安裝Apache,就是這麼簡單~
$ sudo yum -y install httpd
※參數『-y』是系統幫你自動回答『yes』,對於懶著按Y的我,是蠻好用的。
詳細請參考:鳥哥yum說明文件(http://bit.ly/2wp7LnH)
4.啟用Apache服務
$ sudo systemctl start httpd
5.重啟時啟動Apache服務
$ sudo systemctl enable httpd
6.查看Apache狀態(要養成好習慣,安裝好看狀態,確認是否有啟用。)
$ sudo systemctl status httpd
7.要停用Apache服務
7.要停用Apache服務
$ sudo systemctl stop httpd
STEP 2:開啟防火牆80/443 port
1.請開啟HTTP與HTTPS,HTTP預設是80port,HTTPS則是443,防火牆要開通,否則被防
火牆擋掉而無法連上網站。
$ sudo firewall-cmd --permanent --add-port=80/tcp
$ sudo firewall-cmd --permanent --add-port=443/tcp
2.最後記得要重啟防火牆。
$ sudo firewall-cmd --reload
STEP 2:開啟防火牆80/443 port
1.請開啟HTTP與HTTPS,HTTP預設是80port,HTTPS則是443,防火牆要開通,否則被防
火牆擋掉而無法連上網站。
$ sudo firewall-cmd --permanent --add-port=80/tcp
$ sudo firewall-cmd --permanent --add-port=443/tcp
2.最後記得要重啟防火牆。
$ sudo firewall-cmd --reload
STEP 3:關閉SElinux(可選擇略過)
個人是建議不要關閉SElinux,除非是建立給自己玩的,否則還蠻危險的。
1.修改selinux設定
$ vi /etc/sysconfig/selinux
2.找到SELINUX=enforcing 修改成 SELINUX=disabled
# This file controls the state of SELinux on the system.
# SELINUX= can take one of these three values:
# enforcing - SELinux security policy is enforced.
# permissive - SELinux prints warnings instead of enforcing.
# disabled - No SELinux policy is loaded.
SELINUX=disabled
# SELINUXTYPE= can take one of three two values:
# targeted - Targeted processes are protected,
# minimum - Modification of targeted policy. Only selected processes are protected.
# mls - Multi Level Security protection.
SELINUXTYPE=targeted
[creemeow@localhost ~]$ getenforce
Disabled
STEP 4:連線成果測試(已VirtualBox為例)
1.新增NAT網路 (喜好設定>網路>加入新的NAT網路>確認)
 2.設定成NAT網路,選擇剛剛新增的NAT網路
 3.打上指令ip addr確認『NAT網路』的IP
$ ip addr
如下圖IP為10.0.2.7/24
 4.設定你的轉送規則,我設定連入81port會轉成80port到目的地網站
 5.查看你要連入的VirtualBox的IP
 6.確定好後就連入192.168.56.1:81,以下是成功的畫面!
 ※補充-1連入Putty:
1.開啟22port
 2.去官方網站下載Putty(https://www.chiark.greenend.org.uk/~sgtatham/putty/latest.html)
3.Host Name打上192.168.56.1;Port22
 4.這樣就連線成功囉

如果有需要關掉防火牆設備,可以執行以下指令。
1.設定防火牆重開機後禁用
$ sudo systemctl disable firewalld
2.防火牆停用
$ sudo systemctl stop firewalld
3.最後查看防火牆狀態,確認是否關閉
$ sudo systemctl status firewalld
參考資料:
個人是建議不要關閉SElinux,除非是建立給自己玩的,否則還蠻危險的。
1.修改selinux設定
$ vi /etc/sysconfig/selinux
2.找到SELINUX=enforcing 修改成 SELINUX=disabled
# This file controls the state of SELinux on the system.
# SELINUX= can take one of these three values:
# enforcing - SELinux security policy is enforced.
# permissive - SELinux prints warnings instead of enforcing.
# disabled - No SELinux policy is loaded.
SELINUX=disabled
# SELINUXTYPE= can take one of three two values:
# targeted - Targeted processes are protected,
# minimum - Modification of targeted policy. Only selected processes are protected.
# mls - Multi Level Security protection.
SELINUXTYPE=targeted
3.重啟
$ sudo reboot
4.使用getenforce查看是否disabled
$ getenforce
輸出結果如下:[creemeow@localhost ~]$ getenforce
Disabled
STEP 4:連線成果測試(已VirtualBox為例)
1.新增NAT網路 (喜好設定>網路>加入新的NAT網路>確認)


$ ip addr
如下圖IP為10.0.2.7/24


1.開啟22port

3.Host Name打上192.168.56.1;Port22


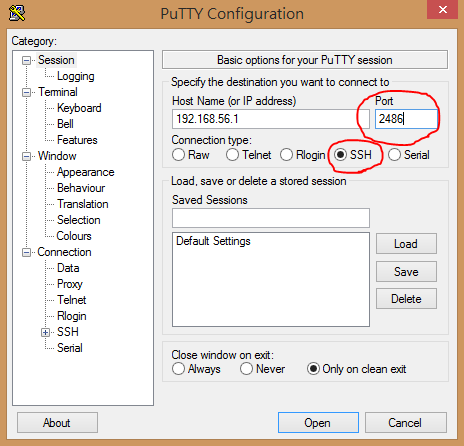
※補充-2修改SSH預設port :
1.關閉ssh防火牆port
# firewall-cmd --remove-service=ssh --permanent
2.開啟要SSH的port,舉例來說,我開2486的port做ssh連線
# firewall-cmd --permanent --add-port=2486/tcp
3.重啟防火牆
# firewall-cmd --reload
4.到sshd_config修改ssh預設port
# vim /etc/ssh/sshd_config
5.把#Port 22改成Port 2486
# semanage port -a -t ssh_port_t -p tcp 2486
7.最後重啟ssh服務,做測試連線
1.關閉ssh防火牆port
# firewall-cmd --remove-service=ssh --permanent
2.開啟要SSH的port,舉例來說,我開2486的port做ssh連線
# firewall-cmd --permanent --add-port=2486/tcp
3.重啟防火牆
# firewall-cmd --reload
4.到sshd_config修改ssh預設port
# vim /etc/ssh/sshd_config
5.把#Port 22改成Port 2486
#以上省略...
# If you want to change the port on a SELinux system, you have to tell
# SELinux about this change.
# semanage port -a -t ssh_port_t -p tcp #PORTNUMBER
#
Port 2486
#AddressFamily any
#以下省略...
6.設定selinux,允許開啟ssh的2486port# semanage port -a -t ssh_port_t -p tcp 2486
7.最後重啟ssh服務,做測試連線
# systemctl restart sshd
8.完成


※補充-3關閉防火牆設備 :8.完成

如果有需要關掉防火牆設備,可以執行以下指令。
1.設定防火牆重開機後禁用
$ sudo systemctl disable firewalld
2.防火牆停用
$ sudo systemctl stop firewalld
3.最後查看防火牆狀態,確認是否關閉
$ sudo systemctl status firewalld
How to Install Apache on CentOS 7:http://bit.ly/2wnZVdW
CentOS 7 變更 SSH 埠號 (+SELinux 設定) :https://is.gd/q3WVob
CentOS 7 變更 SSH 埠號 (+SELinux 設定) :https://is.gd/q3WVob


沒有留言:
張貼留言